Monday, November 16, 2020

Crochet Basics

The first thing you will need for crocheting is a great starter crochet hook set. Susan Bates makes my favorite hooks as there is no roundness in the underside of the hook portion so it holds your yarn very well.

If you want to save your stitches from slipping out when you set down your projects, these stitch markers are wonderful, too. They are especially helpful if you ever decide to make beanie hats which are made "in the round."

Here is a great video for absolute beginners in crochet! Watch it as many times as needed, backing up how ever many times it takes! Be sure to pause often to give it a try yourself! In the video you will learn slip knots, chain stitches and single crochet stitch. Remember to be PATIENCE! This is a brand new skill. Give yourself some slack, but also note that practice makes perfect. Crocheting even for ten minutes a day will help tremendously and keep your skills sharp!

With chain stitching and single crochet that you learn in the video, you can make a scarf in a few hours!

Once you master the skills in that video, you can challenge yourself with other skills like stitching in the round, which I use to create these nests for wildlife rescues! 

Have FUN and know that crocheting is a skill for LIFE!


Affiliate links do not increase your cost! Please shop from my links as proceeds go to my Scrapbooking/Crafting club for my seventh grade students. Again, you do NOT pay more when using my affiliate links and I have no idea who bought what. Thanks for shopping with me!

Sunday, June 28, 2020

Want Perfect Hard-Boiled Eggs? STEAM THEM!

To most people, this picture won't mean much - it is just a bowl of perfectly peeled eggs hard boiled eggs, right? You see, most of you buy grocery store-bought eggs, many of which are about a month old by the time they make it to your refrigerator. When you want to make hard boiled eggs, no big deal - the eggs are so old that the inside has already separated from the shell so peeling them is not a problem.

Now, for those of us who prefer farm fresh eggs (that have twice the protein and 1/3 less cholesterol when chickens are allowed to graze on pasture), hard boiled eggs are... challenging. Even when perfectly cooked, most of the whites come off with the shell as they are not old and therefore the inside has not detached from the shell wall. The peeled eggs look like a they were beaten up and thrown off the counter a few times.

Enter STEAM! (Insert dramatic crescendo music here). 

I had heard years ago that steaming was the only way to get perfect peeling hard boiled eggs so why this was not attempted before today, I will never understand. I put a call out to my neighbor to ask if she had a steamer basket I could borrow as I wanted to see if it worked as well as I had heard. If it did, I would order my own right away. Well, my wonderful neighbor, Cathy, not only let me borrow her steamer basket but she also let me borrow an automatic egg cooker that she thinks is pretty nifty and now, so do I! 

That bowl that you see in the picture includes the first set of eggs that I steamed with the automatic egg cooker, which steams the eggs to hard boiled, soft boiled, or poached perfection, your choice. You insert the correct amount of water, poke a little tiny hole in the bottom of each egg (hole puncher comes with), set them on the rack, place the lid and hit the button. Beep! and all done but the cold water bath (I put the whole tray in a strainer and ran the faucet on spray setting for one minute), and You will have the easiest peeling eggs ever! Sound awesome? This little device steams 7 eggs at a time, or, as my husband views it, 14 deviled eggs waiting to happen. Steamer baskets are only a little less expensive, around $10.00 for the adjustable size one, then you have to get the little egg hole poker (the egg cooker comes with one built-in to the water cup), and our little stainless steel one and ran us about $7.00, so just get this egg cooker from my affiliate link, and prepare to be amazed!

Ok, maybe you are not the gadget type, want to steam more than seven eggs at a time, or want to steam other food, (which is healthiest way to prepare vegetables, besides raw), here are some affiliate links to products (in, or soon to be in) my kitchen:

Egg Cooker: Elite Cuisine Easy Electric Egg Cooker

Our stainless steel egg poker: Endurance Egg Piercer

Stainless steel adjustable size steamer basket: Sayfine Steamer Basket

Happy Steaming!

Some of the links in this post may be affiliate links. When using my links to shop, the items' prices are no higher for you, and, if you buy from one of these links, I get a very small percentage of the sale, so please - help this girl out who is trying to help YOU! Thanks! 
Thanks for stopping by!
~Stacie at Blue Sky and Blooms


Saturday, March 21, 2020

Communication During the Coronapocalypse

Many people are finding themselves scrambling to figure out how best to communicate with each other, for both personal and business reasons. Loved ones who have not felt the need to connect via video are suddenly feeling very disconnected. The quality of interactions is often reliant on, and only as good as, the technology skills and equipment of the least technological of the group. Instead of the woulda, coulda, shoulda nonsensical arguing that some families are prone to, let's be productive instead:

THE RIGHT STUFF:

If your loved one has a smartphone and wifi, or a computer with hard line connection only, you are good to go. Most smartphones have video calling built right in. Just click a contact and then the little video camera icon (icon means little picture). If video calling is not turned on, you will find that option in your phone's settings. If your loved one is using a computer and has difficulty hearing, it might be beneficial to send them a great headset that will plug right in and be ready to use. There is a mute feature built into the cord.

Give an older smartphone phone of yours to your loved one with Skype installed, or whatever app you prefer - make them a private account ahead of time and have in login automatically as soon as they hit the icon on the unlocked screen. The Zoom app is great as you can do video call meetings with multiple people all at once - each participate seeing everyone else's video and audio on phones and/or computer screens - as close to being in a room together as some people can be right now. You can record the meeting, too, for people who could not join you.

Can't afford smartphones for all? Walkie talkies are still awesome, people.  The link takes you to a very inexpensive, but durable set of FOUR that run on batteries, so no charging base required. If your kids have friends close by, within range, or family within range and one of the parties does not have a smartphone, walkie talkies are better than phones because they are inexpensive and FUN. Who doesn't like CHHH! at the end of everything you say? If the walkie talkie doesn't make that sound, do it anyway! Have a loved one in a nursing home? Ask if you can get a walkie talkie to them, set to the correct channel (write it on masking tape stuck to the device, too), and include a charging base. Then they have something very light weight and easy to operate, and you can talk through the closed window to each other. Phones can be tough for someone to hold if they are weak or if an aide is not available to help them with the call.

Amazon has a whole range of products to make video calls with and tomsguide.com has easy to read tutorials for a few!

HOLD EVERYTHING:

It is really difficult to talk to anyone for a longer period of time when they are bouncing all over the place, trying to hold a phone two feet from their face. It is actually hard to do as your body is not a fan of holding a pose very long. Work call? That would be a zero on the professionalism scale. Enter this little beauty:

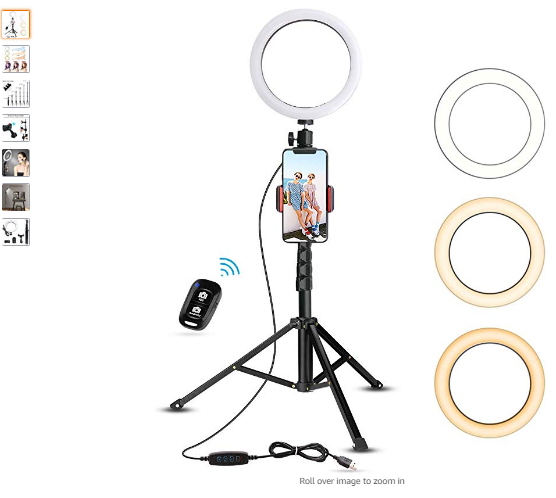
The UBeesize  8" Selfie Ring Light with Tripod Stand & Cell Phone Holder for Live Stream (image by manufacturer)

The photo is a bit misleading as there is only ONE light ring, not three or four. The other rings are there to show you that it produces white light, cool light, and warm light, all controlled with with that nifty little switch you see built into the cord at the bottom of the image.

The light plugs right into your laptop, computer or wall via USB. It is really awesome and I love it. There is VERY LITTLE assembly required and the tripod itself can sit on a table and desk, sure, but it also expands to 51", then the light ring screws in on top, so you can use this stand for full length demos, record yourself and your projected presentation at the same time! Fits any smartphone.


NO SUBSTITUTE FOR YOUR VOICE:

Texting doesn't cut it, people. Your loved ones NEED to at least HEAR you, if they cannot see you. MAKE TIME to talk to people that love you. If you have an elderly relative, please do not think it is ok for just one of you to talk to him or her. They want to feel loved by everyone - don't rob them by calling while the baby is sleeping - they want to see the baby, hear the baby, experience as much as they can.

GETTING TO WORK:

If you are one of millions working from home, Wirecutter has a quick-read article and diagram of a setup for doing videoconferencing at home, but if you'd rather just stay right here (thanks!), the big points are:

Check your settings, making sure you have maximum bandwidth - make sure NO ONE in your home is streaming while you are on a call! And for goodness sake, enable mirror effect so any text showing is going in the right direction! This will be in your display/photo/video settings. Androids generally have this as default, but for some reason, many iPhone users have Instagram feeds full of backward text - on their clothing, hats, signage, everything! Ugh. Fix it.

Minimize disruptions by setting up an area in a room with a door that locks. Put a sign on the outside of the door that clearly states something like: "Videocall in progress. Do not interrupt!" If you have not yet seen this video of children interrupting a call, watch it now - believe me, not everyone would be as forgiving or think it cute: Children Interrupt BBC News Interview.

Use a good camera and the right lighting: Again, I highly recommend the setup that I recommended above: The UBeesize  8" Selfie Ring Light with Tripod Stand & Cell Phone Holder for Live Stream

Get good sound by using a headset with a great mic (mute button included), or invest in an external mic (mute button right on top).

Keep in professional from the background to your apparel. Do NOT make the mistake of dressing from the waist up and sweats below - if you need to dash for something you need, you might forget to turn off your video before you pop up. Just get dressed! No loud jewelry (your seventeen alex and ani bracelets need to wait this one out on your dresser), no inappropriate clothing. Avoid wheeled chairs as they make more noise than you think during a call. A bookshelf and plants work nicely as a backdrop, but no blinds or thin curtains that can back light you and make you a silhouette!

WE CAN DO THIS, PEOPLE! Stay safe, stay integral, stay HOME.

Some of the links in this post are affiliate links. The prices are no higher for you, and, if you buy from one of these links, I get meager penance, so please - help a girl out who is trying to help YOU! Thanks! 


Wednesday, July 17, 2019

MUST HAVE PRODUCTS for Your Older Dog


Recently, my dog, Molly (the Girlfriend), got old. She has had three surgeries in the last 18 months to remove a recurring cancerous tumor on the back of her left leg. After each surgery, we have rehabbed her to the point where she was back to walking two to three miles five days a week. Not too shabby for a 12 to 13 year old husky/border collie mutt, but she has been in pain recently and quite suddenly, so she needed some help to improve her quality of life. After a visit to our vet, she is now on two very expensive, but effective medications, Dasuquin Chewable Tablets for Large Dogs and Previcox, a canine-safe anti-inflammatory, available through prescription only. NOTE: If you cannot afford to care for your pet 'til death do you part, please, do not get a pet. Molly has cost us five figures and we will do anything for her as long as she is comfortable, happy and active, within reason for her age. My mom helped us find most of these products and I thank her profusely! Thanks, Mama! You are the BEST.
We decided it was time to get some items that would make Molly's changing last chapters as comfortable as possible. During all of her surgical recoveries we SO WISH we had found this, the BEST THING we have bought for her: Peak Pooch Dog Walking Lifting Carrying Harness with Mesh Support padded Vest and Reflective piping for safety. It has been a LIFE SAVER for Molly and for us. The handle on top make assisting your dog so easy for both your pup and you! The padding on the bottom of the straps is absolutely wonderful, protecting Molly from any potential pressure point pain. The straps are fully adjustable and the measuring chart is fantastic for finding the very best fit for your dog. Make sure you can easily get two or three fingers in there. Easily, not shoving them underneath.

We have wood floors in our home which are very difficult for ANY dog to run around on and nearly impossible for a dog to navigate if she has weak hind quarters. We have added many non-skid rugs to our home for her, but, being a husky girl who is warm even in our very cool air conditioned home, she likes to sleep on the cool floors. This all sounds great, until she wants to get up. We, of course, are not always at home to help her and certainly do not want her to struggle. 

Enter these great additions: Expawlorer Anti-Slip Dog Socks! Measure carefully before ordering! I took my time and got the right size for our girl. I have become quite adept at getting them on her feeties quickly! She is now independent, not skidding around, getting hurt just to get UP. Love these socks. I have not had to use the tape, which would go around the cinched in area above the foot, but it's there if she ever starts getting these off. I put them on her front feet only so far, but as her weak hide end conditions worsen with age, we are ready for all fours!

Molly is afraid of storms, and, yes, these shirts help! ThunderShirt Classic Dog Anxiety Jacket is really quick to put on, but the point here is to get it on BEFORE your need it whenever possible. I use Vitality Extracts Peaceful Pup oil on her jacket, on the chest area. I use the 30ml eye dropper bottle, but it comes as a roll-on, too. The stuff is not cheap, but a little goes a long way!

I cannot stress enough that, while anxiety jackets are effective, I find it most useful when I put it on her 30 minutes or more before the storm arrives. If I come home in the middle of rain, of course, I still put it right on her.

As mentioned, Molly has a hard time with sliding on slippery surfaces, and that includes the leather seats in my car. My parents visited recently and had the nicest, most effective car seat cover that I have ever seen, and now I have one, too! The URPOWER Car Seat Cover, with slip-proof backing and waterproof fabric (YES!) comes in different styles at different prices, but this one works great for us. There are even two large pockets for holding leashes, collapsible bowls, whatever! The best part? The white pieces that you see in the lower left of the picture from the manufacturer. Fold your seats forward, put the seat anchors through, and snap your seats back in place. No more balling up, sliding around, etc. LOVE IT. This is the fourth car seat cover I have purchased, and, thankfully, the last. BUT WAIT, THERE'S MORE! There are velcro seat belt openings so your dog is not tripping on them and TWO included seat belts that fit any standard vehicle seat belt receiving ends! Just clip onto your pet's harness and click it to safely keep your dog secure and in the back seat! If you want one with mesh so your shorter pets can see forward, check out this model, still under $40.00, the URPOWER Dog Seat Cover with Detachable Mesh Visual Window!

And one last thing: outdoor stairs. Do your dog a favor like we did - cover the stairs with outdoor carpet - one piece screwed in at the top, making a step 'back' if there are not any backs to your stairs, dogs slide their feet through, often smacking their chests against the hard steps and causing injuries to legs, backs and hips. Give your dog a non-slip surface. The easiest way is to use this 3'x5' artificial turf. It is 3' wide, perfect for steps, you can trim in with a utility knife, and it is tough enough, is screwed down properly, to assure that you dog will not slip and get hurt on stairs.

If you have any questions about any of these products that I own, let me know! They all make our Molly's life easier and I believe will improve the life of your dog, too!

Thanks for reading!

~Stacie

All opinions here are based on the facts that I have gained from my experiences. If you purchase anything linked here, I get a very small percentage at no additional cost to you! Pretty please? It's good stuff, or I would not be telling you about it, I promise! All photos above, except Molly, are the manufacturers, as they show excellent detail and represent the products best.


Thursday, July 11, 2019

The Best Products to Prevent Lyme Disease and Remove Ticks!


In Pennsylvania, and many other states, deer ticks are a huge problem. While many doctors still need to be convinced that Lyme is 'a real thing,' the Lyme Disease Maps: Historical Data page at Centers for Disease Control and Prevention (CDC) is sharing information as fast as it an be analyzed. Go to the link, click on 2012 and work your way to now. Oh, and know that deer ticks are not the only ticks in the country that can spread Lyme and, furthermore, Lyme is not the only disease ticks spread! Our friends to the west know this too well because of Rocky Mountain Spotted Fever.

YOU DO NOT NEED TO BE IN THE WOODS TO GET TICK BITES AND LYME DISEASE! Anywhere that a mouse can walk or a bird can fly (usually ticks' first hosts), there can be ticks there waiting, literally, to grab you. Grass, low leaves on trees, even your pets can provide the vehicle to get ticks to your skin. I have had two ticks attached in the triceps area and I can surmise that, while holding a chicken or putting my arm around my dog, the ticks crawled right on. No, you usually do not feel them. Even if your pets have Seresto collars or other vet-prescribed tick meds, the ticks can still be transported on the fur of your pet. Chickens and guinea hens eat ticks, but if a tick latches on feathers before preening time, you are out of luck.

Now, keep in mind that ticks are vector parasites: they carry and spread diseases, but they do not get sick from the diseases that they carry. They go through each phase of life biting hosts and spreading Lyme Disease, the effects of which I will not delve into because they are too numerous and terrible. If you want to learn more about that, go here, but know that the bulls-eye rash does NOT show up on about 30% of subjects bitten, just like it did not on my mom, nor my best friend.

Ticks in the nymph phase are able to transmit Lyme. I offer, for your disgust, these images of a tick that I removed from my parents' dog, Mick, recently. First, know that the tick is NOT dead, even though its legs are in the traditional 'dead bug' position. I once kept a tick in a sealed jar for ONE MONTH, no air or water. It had shriveled up to nothing. On Day 31, I opened the jar at 8:30AM and re-closed it. By 10:30AM that thing was moving, I kid you not. Please note that a placed a ball point pen near the tick. Now go open a ball point pen and look at the roller. That is how small these things are in the nymph phase. When they morph in adults, they are only the size of an apple seed.

Same tick, but next to it is the pair of tweezers that I was about to kill it with, all setting on a paper towel. THE ONLY WAY to kill ticks is to treat them like the little zombies they are and STAB THEM IN THE HEAD. They do not drown, as mentioned above, depriving them of oxygen does not kill them. See the two pointy things coming from the head? That is its 'mouthparts' that ticks embed in your skin, or your pets, as they suck your blood and spread disease to you. If you do not remove them properly and leave the mouth behind, THE TICK WILL KEEP FEEDING AND SPREADING DISEASE! People often use tweezers to remove ticks. There are MANY issues with this method, including the mouth breaking off in you or your pet and you would never know it. Then you would have to go to the ER/ED or to an urgent care center to have it dug out. Not my idea of a good time.

This is how I SAFELY and COMPLETELY removed the deer tick from Mick's skin (and from my own about a month ago). Drum roll... The Original Tick Twister by OTOM! The link will take you to a TWO PACK (each pack has two sizes), so for less than a dollar more than one set, you get TWO SETS of Tick Twisters! I bought one for us for my travel bag and one for friends who did not have this incredible little device, and I also have a set for my purse so I  have them with me wherever I go. The very first picture (at top) shows the tick stuck in the smaller size Tick Twister, just right for holding the tick while you stab it in the head with the sharp, pointy end of tweezers! After use, I disinfect everything, tools and surfaces, with alcohol using a cotton round or a Qtip. 

On my boots, pants and shirts that I wear outside to mow, chicken keep, weed, etc., I use this awesome product: Repel Clothing and Gear Insect Repellent. This particular product is NOT FOR SKIN, but for any fabric or porous surface that you want the creepy crawly disease spreaders to stay OFF of, this is the stuff. It lasts up to two weeks! Just spray it on and let dry before anything touches your skin. I actually write NOT FOR SKIN in silver Sharpie on the top of the cap and cover it with scotch tape, just so everyone knows!
On my skin, I use only this product because it WORKS for ALL biting insects, even for my 0+ blood mosquito-magnet self! The greatest part about Avon Expedition Bug Guard Plus Repellent is that there is no Deet so you do NOT have to wash it off every night (read: camping!) and it also has SPF28 which works all day, even while sweating! This is NOT Skin So Soft Bath Oil! Truly the best bug repellent on the market, it is unscented for which my allergic-to-everything-scented sinuses are very appreciative! 

Once you are in for the day, SHOWER and use bare hands to lather up so you can FEEL anything abnormal. Washcloths, sponges and any other bathing aid will not let you feel for the little suckers! Use those only after you have felt every inch of your skin. If you have questions about ANYTHING I have talked about in this blog post, please ask! Be safe out there! Thanks for reading!

~Stacie at Blue Sky and Blooms

Here's Mick, in case you love dogs, too!

All opinions here are based on the facts that I have gained from my experiences. If you purchase anything linked here, I get a very small percentage at no additional cost to you! Pretty please? It's good stuff, or I would not be telling you about it, I promise!


Sunday, May 12, 2019

Crocheted Nests for Wildlife Rehabilitation

"Be the change you wish to see in the world." ~Ghandi


Welcome to Blue Sky and Blooms! Don't you just smile when you say that? 🌺 I hope that you do, as happiness is the goal here! 

Recently, my wonderful mom shared a post on Facebook from Owl's Nest Sanctuary for Wildlife in Odessa, Florida. The text read:

"Knitted Nest 911!!! Never did we think we would be in need of more knitted nests. Last year we actually began turning them away but this year we are nearing Songbird capacity. Both of our brooders are full and we barely have enough nests to house everyone within them. If you or someone you know knits or crochets we are in dire need of nests and other supplies or another brooder wouldn't hurt either."

Well, I crochet, and that sounded like an excellent opportunity to help, so I was (and am) all in! That night, I crocheted these two little beauties, each 3" interior diameter:


I had asked for a pattern so that I would know what size to make, but the Sanctuary was too busy saving wildlife to respond that night, so I made these on my own, modeled after a real birds' nest that I have. The next day, I made one more and threw in an orange 8" diameter basket I had crocheted and a lime green hummingbird-sized basket in a padded envelope and out it went!

As soon as I had read the post, I know that I would use Lion Brand Yarn Hometown USA in Little Rock Granite that I had bought at Joann's. It is such an easy yarn to use for this project. An 8mm crochet hook was perfect to tightly crochet the nests. The orange basket that I sent (more Lion Brand Yarn Hometown USA in Syracuse Orange, about 8" in diameter, will be perfect for rehabilitating rabbit kits, opossum joeys (tick-eating machines!), or any other groups of bigger-than-bird babies!

Because it was difficult finding a pattern, I wanted to help in that capacity, too, so I shared with Owl's Nest that I would write a pattern and share it so that others can crochet these nests for babies of all species in need. Read on!

The day that I sent the package to Odessa, Owl's nest replied to me: "As far as height and diameter, we could use all sizes! It’s funny that you mention hummingbird because we’ve got one in our care currently! Our most popular size would be probably the size of a beanie, 5-6” diameter and 4-5” height. If they’re bigger we can just put more babies in it and smaller ones get used for smaller babies!"

I cannot stress enough that the nests must be TIGHTLY crocheted or knitted to protect tiny legs and feet from injury.


Once I had the asked-for dimensions, I made two more! These two are over 5" in diameter and almost 5" tall. The photos at right show the same two nests. The bottom photo shows them unfolded. Folding the nests is not necessary as they easily stand on their own, but, when folded, the sides are extra sturdy to hold those babies in. 

Your work must stand upright on its own, so if you are using really thin yarn, double or triple it. 

The yarn I used to crochet these is Lion Brand Homespun in, "Barley." Being a very different yarn than Lion Brand Yarn's Hometown USA (which I prefer for this particular application, as shown in the first nests shown), it is very thin in comparison and harder to crochet as tight as needed to help be sure little baby legs will not go through, get stuck, and become injured. I just happened to have a skein of this and I like the 'real nest look' it creates, with the varied shades of brown. I used a size 5.5mm hook with this particular yarn. One skein makes these two nests and a three inch diameter nest, which is my next project to finish off the skein. 

THE PATTERN:

Use the appropriate size crochet hook as given on your yarn wrapper (link is for set of hooks, sizes 2-10), or a size smaller, and a stitch marker. If you do not yet own stitch markers, use a paper clip. You will also need a ruler or measuring tape.

You will be stitching 'in the round,' meaning, making circles, for the base of the nest. The stitch marker is a necessity so you know when you are beginning a new circle. You only need to know how to make a chain and do single crochet stitches to make a nest. That's it! ch means chain and sc means single crochet. The number of circles you make depends on the yarn you are using. The idea is to add SIX STITCHES more in each circle. In parentheses, you will see pattern of the needed stitches for each stitch. After a nest or two, you will be hooked! Get it? 😏

If you are relatively new to crochet, perhaps try to make a smaller nest (3" diameter or so) to help build your confidence. I highly recommend Lion Brand Yarn Hometown USA in any color, (I just happen to love Little Rock Granite for its nest look coloring, but babies do not care - ANY COLOR will do!) An 8mm crochet hook was perfect to tightly crochet the nests with this yarn.

1st round: ch 3, then, in the middle loop, sc 6 stitches in the same loop, (you can also use the magic circle technique here, but do not need to as long as your stitches are consistently tight). Insert stitch marker. Count 6 stitches.

2nd round: In each of those six stitches, sc two stitches in the same stitch. Insert stitch marker. (2-2-2-2-2-2) Count 12 stitches.

3rd round: sc in first stitch, two sc in second stitch, sc in third stitch, two sc in fourth and so on to stitch marker.  (1-2-1-2-1-2-1-2-1-2-1-2) Count 18 stitches. Move stitch marker to your last stitch.

4th round: sc in first and second stitch, two sc in third stitch, sc in fourth and fifth stitch, two sc in sixth stitch and so on. Insert stitch marker. (1-1-2-1-1-2-1-1-2-1-1-2) Count 18 stitches.

5th round: sc in first, second and third stitch, two sc in fourth stitch, sc in fifth, six and seventh stitch, two sc in eighth stitch, and so on. Insert stitch marker. (1-1-1-2-1-1-1-2-1-1-1-2-1-1-1-2-1-1-1-2-1-1-1-2) Count 24 stitches.

See the pattern now? Every circle is six more stitches than the last. ALWAYS COUNT EACH ROUND to be sure you are on track.

6th round: sc in first through fourth stitches, two sc in the fifth stitch, and so on to your marker. Count 30 stitches.

7th round: sc in first through fifth stitches, two sc in the sixth stitch, and so on to your marker. Count 36 stitches.

Keep going in this manner, increasing your stitches by six in each round, until your round work measures your desired diameter. Then, just one sc in each stitch to build the sides to the desired height of your nest!

Donate to a wildlife sanctuary near you or send nests to:

Owl's Nest Sanctuary for Wildlife
12932 Royal George Ave

Odessa, FL 33556


Any questions? Let me know! And please, share your work!

If you have appreciated this post, please let me know! Thanks for changing caring to action!

~Stacie at Blue Sky and Blooms

As an Amazon Associate I earn from qualifying purchases.


Friday, June 1, 2018

Welcome to the Flock! Integrating New Flock Members

Integrating New Flock Members - written in Spring, 2016, but not published at that time.

It was a stressful weekend. My two October 2015-born youngsters were put in with the rest of the flock this weekend. The young ones had been in the mini/nursery coop for a while before I let them run around all together, free range. This practice I had read about from one of the big-time chicken bloggers. Weeks of separate but together, she said. Both groups had ample opportunity to see each other, smell each other, and, as I found too late, despise each other. I want to help you through this process in ways that I do not really feel have been thoroughly covered in the online blogs I have read.

RULE #1: Make sure that you follow the 10 sq. ft. per bird rule to determine the size of your run.

I am currently undersized and I need to build an addition to my run ASAP since I have added two more. I have a smaller coop (4'x5' floor plan by over 5' tall with more than enough low and high roost space) which does not bother me, nor the flock, as they really only go in there to sleep, or one or two at a time, to lay their eggs. I enclose the entire run with plastic when winter comes so it is wind-free in the run - they are out all the time from sun up to sunset, by choice. A too-small run will prevent a bird being attacked from being able to get away. It is much too easy for them to hurt each other in a confined space. Respect and observe Rule #1.

RULE #2: Now that you know that Rule #1 is paramount, as soon as your young birds are a comparable size to the other members of your flock, integrate them. Do not wait and let them stare at each other like zoo animals for months. I should have integrated about a month before I did, but I was worried about my two roosters fighting. They attacked each other during free range time and stalked along each other's runs if I took turns letting them out. They get along better now that they are in the coop and run together than they did when they were separated.

RULE #3:  Do it at night.

When the time comes to integrate your new flock members, wait until after it has actually been dark for about an hour so that all chickens are as chill as possible. Check quickly inside the main coop so that you know where the spaces to place the new members. Then, as silently as possible (do not talk to the chickens - it you rile them, that's on you!), and with as little light as possible, gently grab around the wings of the new chicken, lift and glide on over to the main coop to place the new guy right on a roost, making sure his feet are firmly on the 4" side of the 2x4 (which is what all roosts should be for maximum stability, better sleep, and less chance of frostbite). Remember, the birds are more than half asleep - safety first. Then repeat with multiple birds.

RULE #4: Don't sleep in the next morning.

Get right to the coop as soon as you can, because when day breaks, they will all see each other and it might not be a positive experience for everyone. If you know that your run truly is predator proof, leave the coop door open in case anyone needs to escape. Once the light hits their faces and they realize who is who, it can be unpredictable. I brought oatmeal to all on the first and second mornings of the integration and I provided three different bowls for the eight of them, the bowls all spread out in the run, to discourage pecking nonsense. My hen, Caroline, once the victim of bullying herself for months, has decided to be the main bully to my sweet Little Sister.

RULE #5Create multi-levels for escape-needing birds! My run is over 6' tall and I have two full-width roosts. This has been a life-saver, quite literally, for Little Sister, as, after eating in the morning, she goes to the highest roost where no one harasses her. Her confidence is growing, being up there, and she can fly down easily to go back over to the coop to lay her eggs.